Read Happy Endings: Finishing the Edges of Your Quilt Online
Authors: Mimi Dietrich
Tags: #Crafts & Hobbies, #Quilts & Quilting
Happy Endings: Finishing the Edges of Your Quilt (20 page)
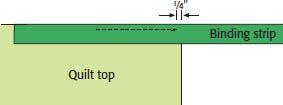
1.
Sew the binding along the first edge of the quilt. If you are using double-fold binding, stop stitching ¼" from the end and backstitch. If you are using single-fold binding or if your seam allowance is wider than ¼", you will need to stop stitching the width of the seam from the end.

Happy Ending Hint
A straight pin will help you mark the place to stop stitching. Turn your quilt to the wrong side and stick a pin into the corner so that it is ¼" from each of the edges, pushing it straight through all layers. The place where the pin comes out on the top marks the place where you will stop stitching. Insert another pin in this spot on the front and pin the binding to the quilt. “Where the pin goes in” signals your place to stop stitching.


2.
Fold the binding so that it extends straight up from the second edge of the quilt. You’ll be creating a diagonal fold, which will in turn create the miter.

3.
Fold the binding down, aligning it with the second edge of the quilt. The fold should be even with the first edge of the quilt. You may want to use a couple of pins to hold the fold in place.

4.
Sew the binding to the next edge of the quilt. You can start right at the edge unless your machine has a hard time getting started on so many layers of fabric. In that case, you can start sewing ¼" from the fold, but make sure to backstitch.

5.
Repeat these steps for the remaining corners on your quilt.
Happy Ending Hint
If it looks as though a binding seam will occur near the miter fold, you can choose to ignore it and live with a little bulk. If you prefer, remove the quilt from the sewing machine and reseam the binding so that the seam falls before the mitered corner.
6.
To complete the binding, you’ll need to fold the miters on the front and the back. On the quilt top, place your finger under the corner fold and push the fabric toward the point.

7.
Fold the binding over the edge and toward the back of the quilt. On the front, the fabric automatically folds into a miter.

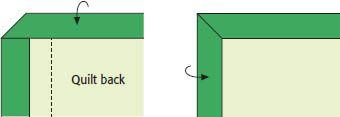
8.
On the back, fold the binding flat over one edge of the quilt. At the corner, the binding will form a diagonal fold. As you turn under the second edge, the diagonal fold creates a miter on the back of the quilt.
Other books
Band Fags! by Frank Anthony Polito
A Family Business by Ken Englade
Ghast Me Gently (Wicked Good Witches Book 4) by Starla Silver
Exposure by Helen Dunmore
You Can See Me by A. E. Via
The Suns of Liberty (Book 2): Revolution by Lowell, Michael Ivan
Junie B. Jones Is Not a Crook by Barbara Park
Get Wallace! by Alexander Wilson
the Source (2008) by Cordy| Michael
Catching Serenity (Serenity #4) by Eden Butler