Read Happy Endings: Finishing the Edges of Your Quilt Online
Authors: Mimi Dietrich
Tags: #Crafts & Hobbies, #Quilts & Quilting
Happy Endings: Finishing the Edges of Your Quilt (4 page)
1.
Before adding the mitered border, use a rotary-cutting ruler to make sure that each corner of your quilt is perfectly square. Trim if necessary.

2.
Measure the quilt top from raw edge to raw edge, including the seam allowances. For first the length, then the width of your quilt top, add two times the cut width of your borders, plus 4". For instance, if your quilt top measures 60" long and you’re planning to add 6" borders, add 60" + 6" + 6" + 4" = 76". Cut two side borders to this length. Repeat the calculations for the top and bottom borders, adding 6" + 6" + 4", or 16" to the width of your quilt top.
3.
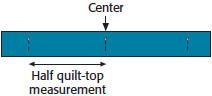
Fold the borders in half to find the center and mark each with a pin. Also mark half the quilt-top measurement with a pin near each end of each border strip. In our example, if the quilt top is 60" long, measure 30" from the center marking and put a pin at this measurement. Repeat for the other end of the border.
4.
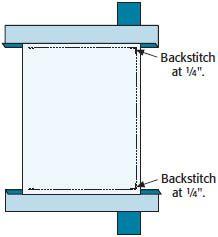
With right sides together and center pins matching, pin one border strip to the quilt top. Also match the outer pins to the raw edges of the quilt top. Stitch, leaving ¼" of the quilt top unstitched at the beginning and end of each seam; backstitch. Press the seams toward the borders. Repeat for all four borders.
5.
With the right side up, place the first corner to be mitered on your ironing board. Pin the quilt to the ironing board to keep it from pulling and the corner from slipping. Position the quilt and borders as shown, with the vertical border overlapping the horizontal border.

6.
Fold the vertical border under at a 45° angle. Adjust the fold so that the borders meet evenly as shown. Place pins through all layers at the fold. Place your rotary-cutting ruler over the corner to check that the corner is flat and square. Adjust the border for a perfect miter if necessary. When everything is straight and square, remove the pins and press the fold with a steam iron.

7.
Carefully center a piece of 1"-wide masking tape over the mitered fold. It will hold the miter in place as you sew.

8.
Unpin the quilt from the ironing board and turn down the vertical border, folding the center section of the quilt diagonally. Lightly draw a pencil line in the pressed crease. Carefully align the long edges of the border strips.

9.
Sew on the pencil line, through the two borders, being careful not to sew through the tape. Remove the tape. You’ve made your first miter!

10.
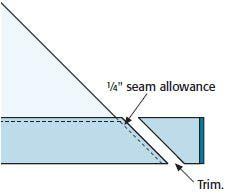
From the right side of the quilt, check to make sure that the borders lie flat; then trim the excess fabric, leaving a ¼"-wide seam allowance. Press the seam open for a perfectly mitered corner.
11.
Repeat steps 5–10 for the remaining three mitered corners.

Happy Ending Hint
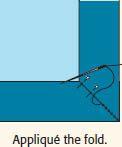
If you wish, you can use hand appliqué stitches to complete the mitered corner. Instead of using masking tape, pin the miter carefully. Appliqué the fold; then trim the excess fabric. Press the seam to one side.
Other books
Beauty and the Blitz by Sosie Frost
Whatever the Price by Jules Bennett
Only Marriage Will Do by Jenna Jaxon
Avalyne Series 01: The Queen of Carleon by Linda Thackeray
Rendezvous in Rome by Carolyn Keene
Secondary Characters by Rachel Schieffelbein
Paint Me a Monster by Janie Baskin
The Outlaw Takes A Bride (The Burnett Brides) by McDaniel, Sylvia
The Cloud Atlas by David Mitchell
What Color Is Your Parachute? by Carol Christen, Jean M. Blomquist, Richard N. Bolles