Read The Art of Manliness: Classic Skills and Manners for the Modern Man Online
Authors: Brett Mckay,Kate Mckay
Tags: #Etiquette, #Humor, #Psychology, #Reference, #Men's Studies, #Men, #Men - Identity, #Gender Studies, #Sex Role, #Masculinity, #Personal & Practical Guides, #Array, #General, #Identity, #Social Science
The Art of Manliness: Classic Skills and Manners for the Modern Man (3 page)
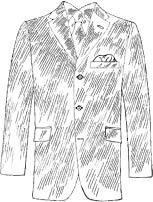
Pocket Square Guidelines
Don’t leave your suit naked.
A suit without a pocket square lacks finished panache. So the first guideline of pocket square usage is to always wear one when you wear a suit or sport coat. It just looks better.
Color coordinating.
A pocket square can be patterned or solid. The general guideline is that your pocket square color should complement some color on your tie. So if your tie has a bit of red, rock a solid red pocket square or a patterned pocket square with some red in it. However, avoid matching the colors exactly. It looks like you’re trying too hard (so never ever buy a tie/pocket square set at your local department store). A white pocket square can be worn with any color tie, making the white handkerchief an essential part of every man’s collection.
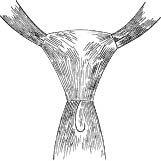
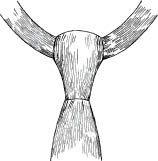
How to Fold a Pocket Square
You have several options on how to fold your pocket square. Some are quite simple and others are complex. It all comes down to personal taste. Here are three simple folds that every man should master.
Figure 1.3 Here are three simple folds that every man should master. From top to bottom: the straight fold, the one corner fold and the puff fold.


The Straight Fold
The straight fold lends a classic look to your suit. What you’ll end up with is a small rectangle peeking out of your breast pocket. Here’s one way to fold it:
1. Lay your pocket square flat.
2. Bring the left side to the right side
3. Bring the bottom towards the top, but don’t fold it all the way.
4. Fold the fabric in thirds horizontally so that it will fit your suit pocket.
The One Corner Fold
With the one corner fold, you’ll have a small peak of fabric coming out your pocket. This one is my favorite of the three. Here’s how to fold it:
1. Lay your pocket square on a flat surface with one corner facing up and one corner facing down so it looks like you have a baseball diamond in front of you.
2. Bring the bottom point to the top point so that you create a triangle.
3. Bring the left corner of the triangle to the right corner, and the right corner to the left corner. You should end up with a long rectangle with a point at the top. It looks sort of like a fence slat.
4. Fold the bottom toward the top, but not all the way.
5. Place it in your suit. Adjust until you get the desired amount of point coming out of the pocket.
The Puff Fold
The puff “fold” is the simplest of the folds, as there’s no actual folding involved. The result is a small puff of fabric coming out of your suit pocket. Here’s how to do it.
1. Lay the pocket square flat.
2. Pinch the middle of the fabric, allowing the folds to come in naturally.
3. With one hand firmly holding the pocket square, use your other hand to gently gather it together.
4. Now gracefully gather up the bottom of the pocket square.
5. Place it in your suit. Fiddle with it until you get the desired puffiness.
Three Ways to Tie a Tie
It’s a sad fact, but there are grown men who don’t know how to tie a necktie. If they have a big interview that afternoon, they’ll go shopping for a clip-on. Even if a man does know how to tie a tie, their knowledge is often limited to just one knot. But there are several ways to tie a necktie. Certain knots should be used with certain shirt collars and tie fabric materials to get the best results for your appearance. Below, we show you three classic necktie knots every man should know and give you the lowdown on when you should use them.
Figure 1.4 Here are three classic necktie knots every man should know. From top to bottom: the Windsor knot, the half Windsor knot and the four-in-hand knot.

The Windsor Knot
The Windsor knot gives you a wide triangular knot that’s good for more formal settings. This knot is best worn with a wide spread collar.
1. Drape the tie around your neck. The wide end should extend about 12 inches below the narrow end of the tie. Cross the wide part of the tie over the narrow end.
2. Bring the wide end of the tie up through the hole between your collar and the tie. Then pull it down toward the front.
3. Bring the wide end behind the narrow end and to the right.
4. Pull the wide end back through the loop again. You should have a triangle now where the knot will be.
5. Wrap the wide end around the triangle by pulling the wide end from right to left.
6. Bring the wide end up through the loop a third time.
7. Pull the wide end through the knot in front.
8. Tighten the knot and center it with both hands.
The Half Windsor Knot
This is the Windsor knot’s little brother. Like the Windsor, you’re left with a symmetrical triangle knot, but the Half Windsor is not as large. This knot is appropriate for lighter fabrics and wider ties. It’s best worn with a standard collar.
1. Drape the tie around your neck. The wide end should extend about 12 inches below the narrow end of the tie. Cross the wide part of the tie over the narrow end.
2. Bring the wide end around and behind the narrow end.
3. Bring the wide end up and pull it down through the hole between your collar and tie.
4. Bring the wide end around the front, over the narrow end from right to left.
5. Bring the wide end up back through the loop again.
6. Pull the wide enddown through the knot in front.
7. Tighten the knot and center it with both hands.
The Four-In-Hand Knot
Also known as the “schoolboy,” this is probably the most widely used knot because it’s so easy to tie. It’s a good knot to use if your tie is made of heavier material. It looks best with smaller spread collars.
1. Drape the tie around your neck. The wide end should extend about 12 inches below the narrow end of the tie. Cross the wide part of the tie over the narrow end.
2. Turn the wide end back underneath the narrow end.
3. Continue wrapping the wide end around the narrow end by bringing it across the front of the narrow end again.